Blog
How to Apply DIY Lashes at Home

Aug
Applying DIY lashes at home can be a fun and rewarding way to enhance your natural beauty without the need for professional help. Whether you’re prepping for a special occasion or just want to elevate your everyday look, mastering the art of applying false eyelashes can make a significant difference. Here’s a comprehensive guide on how to apply DIY lashes at home.
Gather Your Materials
Before you start, ensure you have all the necessary tools:
False eyelashes: Choose a style that complements your eye shape and the look you’re aiming for. There are various types, from natural to dramatic.
Eyelash adhesive: Opt for a high-quality glue to ensure your lashes stay put.
Tweezers: These help in placing the lashes precisely.
Scissors: For trimming the lashes to fit your eye shape.
Eyeliner and mascara: To blend the false lashes with your natural ones.
Cotton swabs: For cleaning up any excess glue.
Preparation
Clean and Dry Eyelids: Make sure your eyelids are clean and oil-free. This helps the adhesive stick better and ensures longevity.
Apply Eyeliner: Applying a thin line of eyeliner before the lashes can help disguise the lash band and make the overall look more seamless. You can opt for a liquid or gel eyeliner for a precise line.
Measure and Trim the Lashes
Measure Against Your Eye: Before applying glue, hold the lash strip against your eyelid to measure its length. It should start a few millimeters from the inner corner of your eye and end right before the outer corner.
Trim to Fit: If the lash cluster is not fit your eye shape, trim it from the outer end. Cutting from the inner end can make the lashes look unnatural.
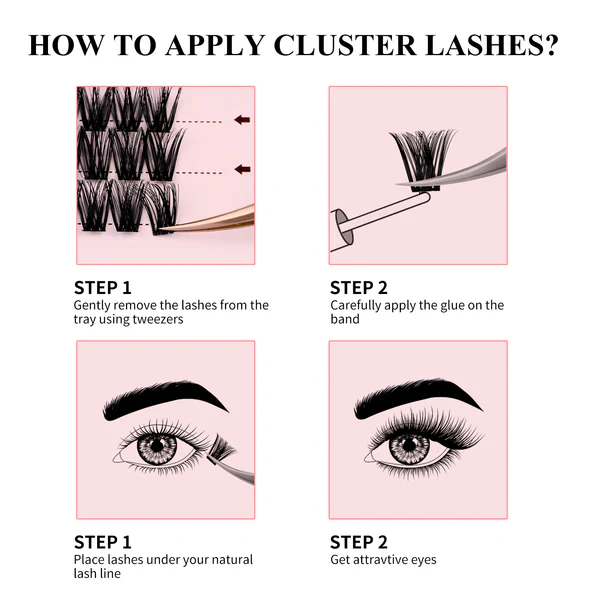
Apply the Adhesive
Use a Thin Line of Glue: Squeeze a small amount of lash adhesive onto a clean surface or the back of your hand. Use a cotton swab or the lash band itself to apply a thin line of glue along the base of the lash strip.
Wait for the Glue to Become Tacky: Let the glue sit for about 30 seconds. It should be tacky but not completely dry. This step is crucial for ensuring the lashes adhere properly.
Apply the Lashes
Use Tweezers for Precision: Using tweezers, carefully place the lash strip as close to your natural lash line as possible. Start from the center, then attach the outer and inner corners.
Press and Secure: Gently press along the lash band to secure the lashes. Hold for a few seconds to ensure they stick.
Blend with Natural Lashes
Touch Up with Eyeliner: Use eyeliner to fill in any gaps and ensure the lash band is concealed. This helps in achieving a flawless finish.
Finishing Touches
Clean Up Any Excess Glue: Use a cotton swab dipped in makeup remover to clean up any visible glue.
Tips for Success
Practice Makes Perfect: Don’t be discouraged if you don’t get it right the first time. Practice will improve your technique.
Choose the Right Lashes: Beginners might find it easier to start with lashes that have a thin, flexible band.
Patience is Key: Take your time with each step to ensure the best results.
Applying DIY lashes at home can be a game-changer for your beauty routine. With these steps, you’ll be able to achieve a professional look with ease and confidence. Enjoy the process and the fabulous results!